
The funny thing about Outkast, is that the lyrics to this song are not actually so clean, clean. Irony. Love it.
But that doesn’t stop the tune from getting stuck in my head. So much so, that I have sung it to both my girls since infancy while they’re getting a bath. So much so, that they sing it, too (with a slight variation because they say “cleam”).

And who doesn’t love a little humor while they’re doing a less-than-thrilling chore like the laundry. Because we’re moving in a few months (I mentioned this the other day and you’ll probably hear it dozens of times), there are no major upgrades going on in this house. No pretty penny tile going up behind the washer and dryer, no beautiful built-ins to replace the wire shelves, and no fantastic stencil on this wall. But that laundry room was D-U-L-L, dull and I couldn’t take it another second. Enter my rustic and whimsical little sign. I love it! And I’m going to share with you how I made this little beauty for just $10!
I picked up 3 pieces of 8 foot lattice from Lowes for 97 cents apiece and some stain. And that was all I had to get. I used a few other supplies but hopefully you’ll already have those (or something that works) in your stockpile like I did.

My trusty (and el cheapo) little mitre box did all the work as I cut the pieces to size.

I had decided that I would make the sign 16 inches wide (no particular reason, just looked like a good width) and wanted two horizontal boards for each line of lettering. I started by using 3 pieces that were each the full 16 in width and placed those at the top, in the middle(ish), and at the bottom. Then I cut 9 different lengths that totaled up to 16 inches (only 2 per row, like 5″and 11″ or 8″ and 8″), and along with the 3 – 16 inch boards I had 12 horizontal rows. I laid them out so they looked pretty then flipped it over so I could stick them all together.

At this point, I still wasn’t exactly sure how I was going to get them to stay together since there were seams at different spots. Lucky for me, my original plan to glue vertical pieces (of the same wood) cut just shorter than the total length along the back worked out. I had imagined using 2 but 3 worked better because the seams were so staggered. Phew. Cause I don’t know what I would have tried next.

I didn’t skimp on the glue. NEVER skimp on the glue. Unless you’re 2 1/2, then trust me, you’re already using enough.

And what kind of carpenter’s daughter doesn’t have any clamps? This one apparently. Hey Mom, tell Dad to get me some clamps for Christmas next year!!!
So I did the next best thing and set a bunch of heavy stuff on it for about an hour. Voila. Perfectly stuck.

While that dried, I sampled my stain on a piece of scrap.

I wanted a weathered look and this stain looked like it would be perfect. I’m so glad I tested it and didn’t just GO FOR IT (which I have a bad habit of doing… like if the glue hadn’t worked on the 3 vertical pieces)! Leaving it on just 2-3 minutes gave a much more opaque finish than I wanted.
I also think you could make a wash with paint which might save you a little cash if you have a color you like on hand. Just water the paint down and go for it! They’re 97 cent pieces of wood! What’s the worst that could happen, right?
 So when I applied it (using a disposable foam brush) I smeared it on and immediately wiped it off. It was the perfect effect!!!
I let it dry for about 4 hours out in the hot desert sun then got to work on the lettering.
 A year and a half ago(ish) I bought these stencil letters and numbers to make a giant ruler to measure my girls’ height (you might have noticed it in my foyer post). They are from the mailbox section in Lowes and cost about $3. You could print out a prettier font and make your own stencils but honestly, t
hat seemed like a lot of extra work this simple style was just what I wanted. I traced them with pencil, then used a firm bristled, angled artist brush to fill in the letters with white acrylic craft paint.
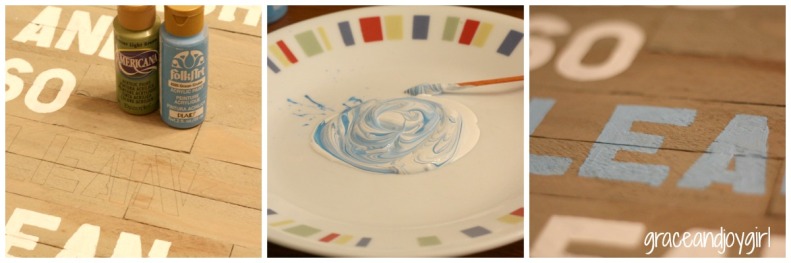
I wanted one of the words to stand out so I painted the first “clean” with blue. I would normally gravitate toward green but went with the color that I thought felt the most “fresh.” And blue reminds me of bubbly soap and clean, clear water. The perfect compliment in a laundry room.
 I sanded the letter a bit so the paint didn’t look so new and my sign was done (I’m sure there should be some type of protective sealer applied at this point but I’m gonna be totally crazy and skip that step).

Then I used my favorite thing EVER to hang the up the sign. I love that I don’t have to get out my drill or a hammer. I love that I don’t have to measure and I LOVE that if it gets placed slightly askew (no I didn’t level it first! stop yelling at me!) I can pull it back off the wall and adjust it. And there are no holes to fill. Love. It.
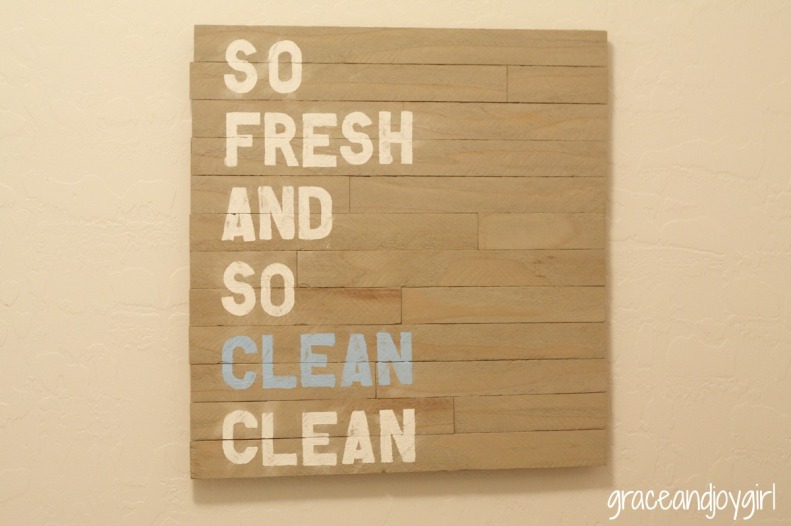
So here she is in all her laundry room glory.

I also put all my laundry supplies (and my lightbulbs) in these canvas totes that were folded up doing nothing but taking up space in my linen closet. I made fun little “Wash” “Rinse” “Dry” “Repeat” labels using MicrosoftWord (which correlate in NO way to the items that are inside) to spiff them up a bit.

There are SO many great laundry room signs out there! I was tempted to use “Drop your duds in the suds!” but rap lyrics are much more my style. Have you added a little humor to any of the rooms in your house with a fun phrase or saying? Create in rustic art? Let me know! I love to be inspired!!!


